Picture the morning after a demanding weekend pickup game. You reach up to grab your favorite ceramic mug from the top shelf, and there it is—a sharp, catching sensation right at the front of your shoulder. It is not exactly agonizing, but it is enough to make you wince and immediately drop your arm, pulling it across your chest in a familiar, desperate attempt to stretch out the discomfort.
We are taught that physical tightness automatically demands pulling. If a muscle feels restricted, your first instinct is to yank it until it yields. You hang your arm from a doorframe, twist your torso aggressively, and wait for the relief that never quite arrives. In fact, by Tuesday, that dull ache has usually crept deeper into the joint space.
Professional trainers and sports therapists see this cycle constantly. The urge to forcefully lengthen a strained rotator cuff is entirely natural, but it ignores the delicate mechanics hiding beneath your collarbone. Rather than fixing the underlying problem, your morning stretch routine might actually be feeding the exact mechanism causing your lingering pain.
The Fraying Rope Myth
Your rotator cuff is not a single, thick cable. It is a highly sensitive web of four small muscles wrapping around the head of your upper arm bone, designed to keep that ball perfectly centered in its shallow socket. When you push your shoulder past its limits, microscopic tears form within those delicate tissues.
Imagine taking a piece of slightly frayed denim and aggressively pulling it apart from both ends. The individual threads separate, thin out, and eventually break under the tension. This is precisely what happens when you apply static stretching to a strained rotator cuff; you are tugging at tissues that are already fighting to knit themselves back together.
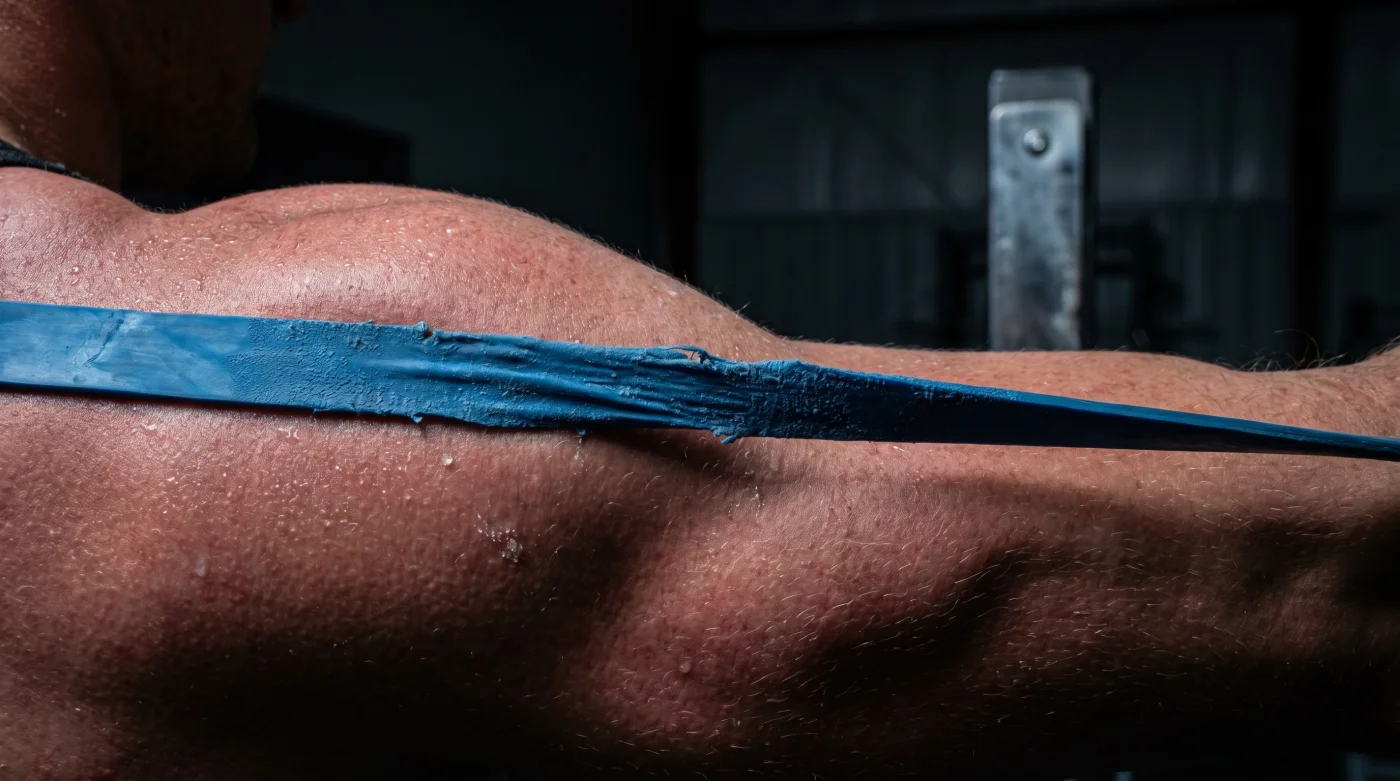
The secret to resolving this strain does not lie in pulling the joint apart, but in coaxing it to glide smoothly. Instead of yanking on frayed fibers, you need to bathe the socket in fluid. Iso-lateral resistance band pulls do exactly this by creating gentle, continuous tension that signals your nervous system to stabilize the joint while simultaneously pumping hydration directly into the capsule.
Consider Marcus Vance, a 42-year-old minor league baseball rehab coordinator. For years, he watched young pitchers sidelined by chronic shoulder impingements after relying heavily on aggressive wall stretches and heavy weighted arm circles. When Vance stripped away the traditional warm-ups and replaced them with slow, targeted resistance band routines, his athletes finally stopped complaining about the dead arm sensation.
He discovered that a simple ten-minute sequence of controlled, isolated band work fortified the joint capsule. It turned what was once a vulnerable hinge into a resilient, lubricated mechanical piston. This protocol is now a non-negotiable routine before anyone on his roster touches a baseball.
Adjustment Layers for Your Game
Not all shoulder strains originate from the exact same physical movement. How you implement your resistance band work depends entirely on where you demand the most from your upper body during your weekend pursuits.
For the weekend quarterback, throwing a spiral requires extreme external rotation. Your cuff often strains because the decelerating muscles on the back of your shoulder blade are completely exhausted. Focus on pulling a light band toward your nose, pausing to squeeze the shoulder blades together when your hands are beside your ears.
Tennis and pickleball players suffer from repetitive overhead snapping motions, meaning the front of the shoulder bears the brunt of every serve. Secure the band at waist height and perform slow internal rotations, pinning your elbow tightly to your ribs. This action specifically rebuilds the internal brake system of your racket swing.
If heavy bench presses and overhead lifts are leaving your shoulders feeling crunchy, your issue is likely joint compression. Loop a medium resistance band above your head, grab it gently, and step back to create traction. Let the band pull your arm slightly forward and upward, creating vital space in the joint without actively stretching the muscle belly.
The Ten-Minute Protocol
Fixing the joint requires intense restraint. The goal here is not physical exhaustion, but neuromuscular re-education. You want the small stabilizing muscles to tremble slightly, not burn with lactic acid buildup. Set a timer for ten minutes and focus entirely on the fluid quality of your shoulder blade’s movement.
To successfully reprogram your shoulder, follow these exact technical steps with zero deviations.
- The Setup: Secure a light resistance band to a sturdy anchor at belly-button height. Stand firmly with your feet hip-width apart.
- The Squeeze: Keep your elbows glued to your sides and pull your hands outward, pausing for a full second.
- The Slow Press: Grasp one end of the band, pressing straight forward slowly. Take four seconds to extend and four seconds to return.
Your tactical toolkit for this routine requires strict adherence to minimal tension. Use a band with no more than ten to fifteen pounds of actual resistance. If you are grimacing or altering your posture to move the band, it is entirely too heavy for this delicate work. Perform fifteen repetitions of each directional press, resting thirty seconds between sets, keeping your breathing slow and nasal.
Trusting the Mechanics
We often treat our bodies like stubborn, unyielding machines that need to be forced into immediate compliance. When a joint aches, our very first human instinct is to wage war on the stiffness, applying maximum force to eradicate the sensation.
Yet, true physical resilience comes from listening to the subtle signals your body sends. Recognizing that static stretching worsens microscopic tears is a quiet but powerful revelation. It shifts your daily mindset from actively punishing the pain to creating an environment for healing.
When you pick up that resistance band, you are actively choosing mechanical precision over sheer brute force. You are deliberate about feeding the joint capsule, lubricating the internal mechanics, and truly preparing your body for whatever throw, swing, or heavy lift comes next. It brings a profound sense of physical autonomy.
“The rotator cuff does not need to be stretched into submission; it needs to be reminded how to glide.” – Marcus Vance, Minor League Rehab Coordinator
| Key Point | Detail | Added Value for the Reader |
|---|---|---|
| Static Stretching | Pulls apart already fraying micro-tears in the muscle fibers. | Prevents delayed recovery and worsening of chronic joint pain. |
| Synovial Lubrication | Gentle movement pumps fluid directly into the tight capsule. | Restores pain-free range of motion without causing further damage. |
| Iso-lateral Pulls | Isolates the stabilizers using continuous, light band tension. | Creates a resilient shoulder capable of handling heavy throws. |
Frequently Asked Questions
Can I use a heavier band if the light one feels too easy?
Resist the urge. Heavy bands engage the large deltoid muscles, bypassing the small rotator cuff stabilizers you are actively trying to heal.Should I feel a burning sensation during this ten-minute protocol?
No, the sensation should feel like a mild, deep fatigue or a slight tremble. If it burns sharply, reduce the tension immediately.How many days a week should I perform these iso-lateral pulls?
For optimal joint lubrication, perform this brief routine daily before any upper body activity, or right when you wake up.Will this fix a completely torn rotator cuff?
This protocol is designed for strain and micro-tears. A complete rupture requires professional medical intervention and physical therapy.Is it normal to hear clicking in my shoulder while using the band?
Painless clicking is generally just gas escaping the joint or a tendon shifting. If the click is accompanied by pain, stop the movement.